Compliance Operator GitOps
by Juan Antonio Osorio Robles
With more and more folks adopting GitOps in their organizations, I decided to take that into use to manage the Compliance operator.
Red Hat recently announced the preview release of OpenShift GitOps, so I thought I’d give that a try. One thing to note is that OpenShift GitOps is based on ArgoCD.
Installing OpenShift GitOps/ArgoCD
Installing the operator via the UI was fairly straight forward. It was a little confusing that the Operator didn’t come with a default ArgoCD instance as shown the tutorial’s video. But the instructions in OperatorHub are quite clear.
First thing we’ll want to do is switch to the appropriate namespace:
$ oc project openshift-gitops
This project/namespace was created by default by the operator you just installed.
Note that the operator will create a default instance of ArgoCD, so you don’t need to create one yourself (as indicated by the Operator’s instructions).
You can verify this as follows:
$ oc get -n openshift-gitops argocd
NAME             AGE
argocd-cluster   4h18m
Note that you might have to wait a little bit for this to persist in the cluster.
Once everything is up and running, this enables the ArgoCD UI. This UI is not
hooked to the OpenShift Oauth server by default. So, to log in, the default user
is admin, and we’re able to get the password with the following command:
$ oc get secret argocd-cluster-cluster -n openshift-gitops \
    -ojsonpath='{.data.admin\.password}' | base64 -d
And that’s it! We’re logged in and ready to use ArgoCD!
The repo
In order to stash all the manifests used and the actual configurations that ArgoCD wil apply, I created the following repo: https://github.com/JAORMX/compliance-operator-gitops
Note that this isn’t meant for production, but merely as a demo of what can be done.
Note that I’ll be using the “upstream” release of the compliance operator as
opposed to downstream. This is because I know fairly well how things work, and
support isn’t a concern for me. But if you want to use the operator and get
support, I highly suggest you use the downstream version. Thus, I created a
CatalogSource object to be able to install the aforementioned upstream release.
This was done with the following manifest:
apiVersion: operators.coreos.com/v1alpha1
kind: CatalogSource
metadata:
  name: compliance-operator
  namespace: openshift-marketplace
spec:
  displayName: Compliance Operator Upstream
  publisher: github.com/openshift/compliance-operator
  sourceType: grpc
  image: quay.io/compliance-operator/compliance-operator-index:latest
This will enable a source called compliance-operator which we’ll reference in
subsequent manifests.
Having done this, we can continue!
Installing the Compliance Operator through ArgoCD
We’d like to tell ArgoCD that we wish to have the Compliance Operator installed in the target cluster. While we can do this via the UI, I’m more of a CLI type of person. So we’ll do this through manifests and yaml.
The following manifest installs the compliance operator:
apiVersion: argoproj.io/v1alpha1
kind: Application
metadata:
  name: compliance-operator-install
  namespace: openshift-gitops
spec:
  destination:
    namespace: openshift-compliance
    server: https://kubernetes.default.svc
  project: default
  source:
    directory:
      recurse: true
    path: co-install
    repoURL: https://github.com/JAORMX/compliance-operator-gitops.git
    targetRevision: main
  syncPolicy:
    automated:
      prune: true
      selfHeal: true
    syncOptions:
    - CreateNamespace=true
Some things to note:
-
I’m using the
defaultproject from ArgoCD. When you scale and start deploying multiple unrelated applications, you might want to create multiple projects too. - This deploys to the
openshift-compliancenamespace which doesn’t exist by default. In order for ArgoCD to create it, we need to add the following snippet to oursyncPolicy: ``` syncOptions:- CreateNamespace=true ``` This will ensure that the namespace gets created.
- We specified the path
co-install, which ensures that this object only tracks the manifests in that directory.
Looking at the manifests
from the co-install directory shows that the installation is quite
straight forward:
-
We have an
OperatorGroup, which defines where our Operator will watch, and thus operate. -
We have a
Subscriptionwhich states the intent of subscribing to the operator’s channel and installing it. Note the object in the repo is currently referencing the upstream release. To install the downstream release, you’d need a manifest that looks as follows:apiVersion: operators.coreos.com/v1alpha1 kind: Subscription metadata: name: compliance-operator-sub namespace: openshift-compliance spec: name: compliance-operator source: redhat-operators sourceNamespace: openshift-marketplace
A healthy deployment
If you have stayed put in the UI, you’ll notice that after applying
the Application manifest, the deployment started progressing and eventually
became healthy:
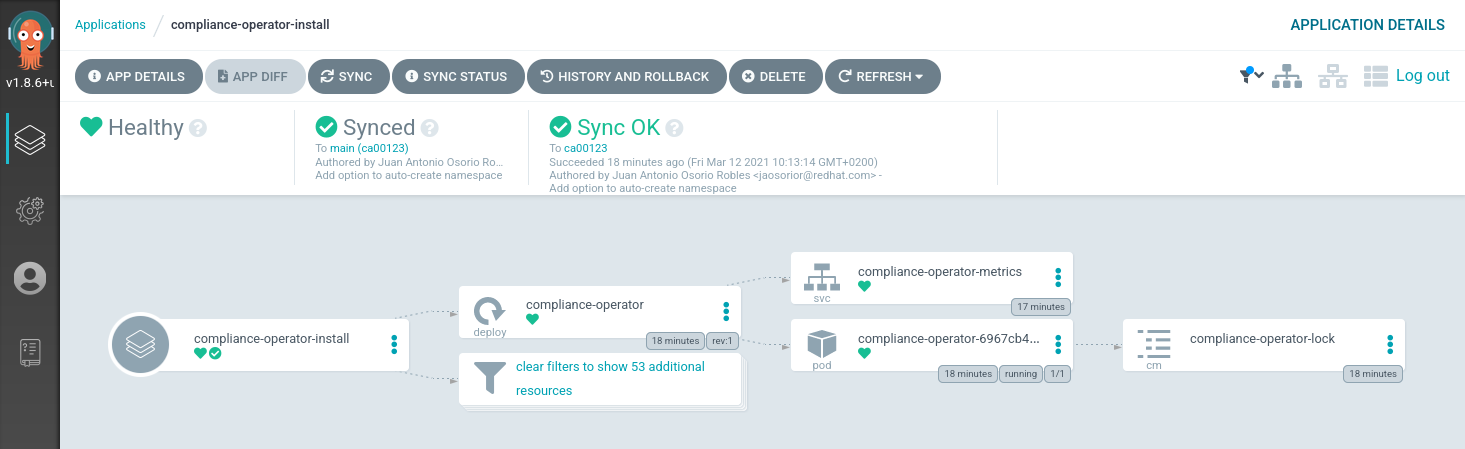
We have the Compliance Operator up and running!
If you’d like to verify that from the CLI, you can do the following:
# Check that the relevant pods are running
$ oc get pods -n openshift-compliance
NAME                                              READY   STATUS    RESTARTS   AGE
compliance-operator-6967cb4d68-ds8ct              1/1     Running   0          23m
ocp4-openshift-compliance-pp-6cd6fd47df-667lw     1/1     Running   0          22m
rhcos4-openshift-compliance-pp-5bdd4ff9b9-f4x9t   1/1     Running   0          22m
We can also see that the default ProfileBundles are valid and ready to be used:
$ oc get profilebundles -n openshift-compliance
NAME     CONTENTIMAGE                           CONTENTFILE         STATUS
ocp4     quay.io/complianceascode/ocp4:latest   ssg-ocp4-ds.xml     VALID
rhcos4   quay.io/complianceascode/ocp4:latest   ssg-rhcos4-ds.xml   VALID
If you’re in a multi-cluster environment, this means that multiple clusters looking at the Git repo and looking at changes. Thus, the Compliance Operator would be installed in all of them.
Scanning
We now want to make sure that the nodes are scanned appropraitely.
For this, we’ll need a ScanSettingsBinding, this bind a profile with
scan settings in order to get scans to run.
We can create an object easily with the oc-compliance` plugin:
$ oc compliance bind --name cis-scan profile/ocp4-cis --dry-run
This command will output a ScanSettingsBinding object, but will not create
it in the cluster. We can then check in the output of that command to a file
in git. It’ll look as follows:
---
apiVersion: compliance.openshift.io/v1alpha1
kind: ScanSettingBinding
metadata:
  name: cis-scan
profiles:
- apiGroup: compliance.openshift.io/v1alpha1
  kind: Profile
  name: ocp4-cis
settingsRef:
  apiGroup: compliance.openshift.io/v1alpha1
  kind: ScanSetting
  name: default
In the reference repo, you can see the scan checked-in.
Before creating this though, note that ArgoCD doesn’t have the permissions to view nor manage these types of resources. So, as an extra step, we need to add them. The following manifest will do the trick:
---
apiVersion: rbac.authorization.k8s.io/v1
kind: ClusterRole
metadata:
  name: scansettingsbinding-creator
rules:
  - verbs:
      - get
      - watch
      - list
    apiGroups:
      - compliance.openshift.io
    resources:
      - scansettings
      - compliancesuites
      - compliancescans
      - compliancecheckresults
      - complianceremediations
  - verbs:
      - '*'
    apiGroups:
      - compliance.openshift.io
    resources:
      - scansettingbindings
---
apiVersion: rbac.authorization.k8s.io/v1
kind: ClusterRoleBinding
metadata:
  name: scansettingsbinding-creator
roleRef:
  apiGroup: rbac.authorization.k8s.io
  kind: ClusterRole
  name: scansettingsbinding-creator
subjects:
  - kind: ServiceAccount
    name: argocd-cluster-argocd-application-controller
    namespace: openshift-gitops
The name of the service account references the default service account for the ArgoCD instance we’re using. If you create another instance for a specific namespace, you’ll need to use another ServiceAccount as it’ll be named differently.
Once we have applied this, we can finally tell ArgoCD that we want to track our scan:
we can do so with the following manifest:
apiVersion: argoproj.io/v1alpha1
kind: Application
metadata:
  name: cis-scan
  namespace: openshift-gitops
spec:
  destination:
    namespace: openshift-compliance
    server: https://kubernetes.default.svc
  project: default
  source:
    directory:
      recurse: true
    path: scan
    repoURL: https://github.com/JAORMX/compliance-operator-gitops.git
    targetRevision: main
  syncPolicy:
    automated:
      prune: true
      selfHeal: true
You’ll start to see progress in the UI:
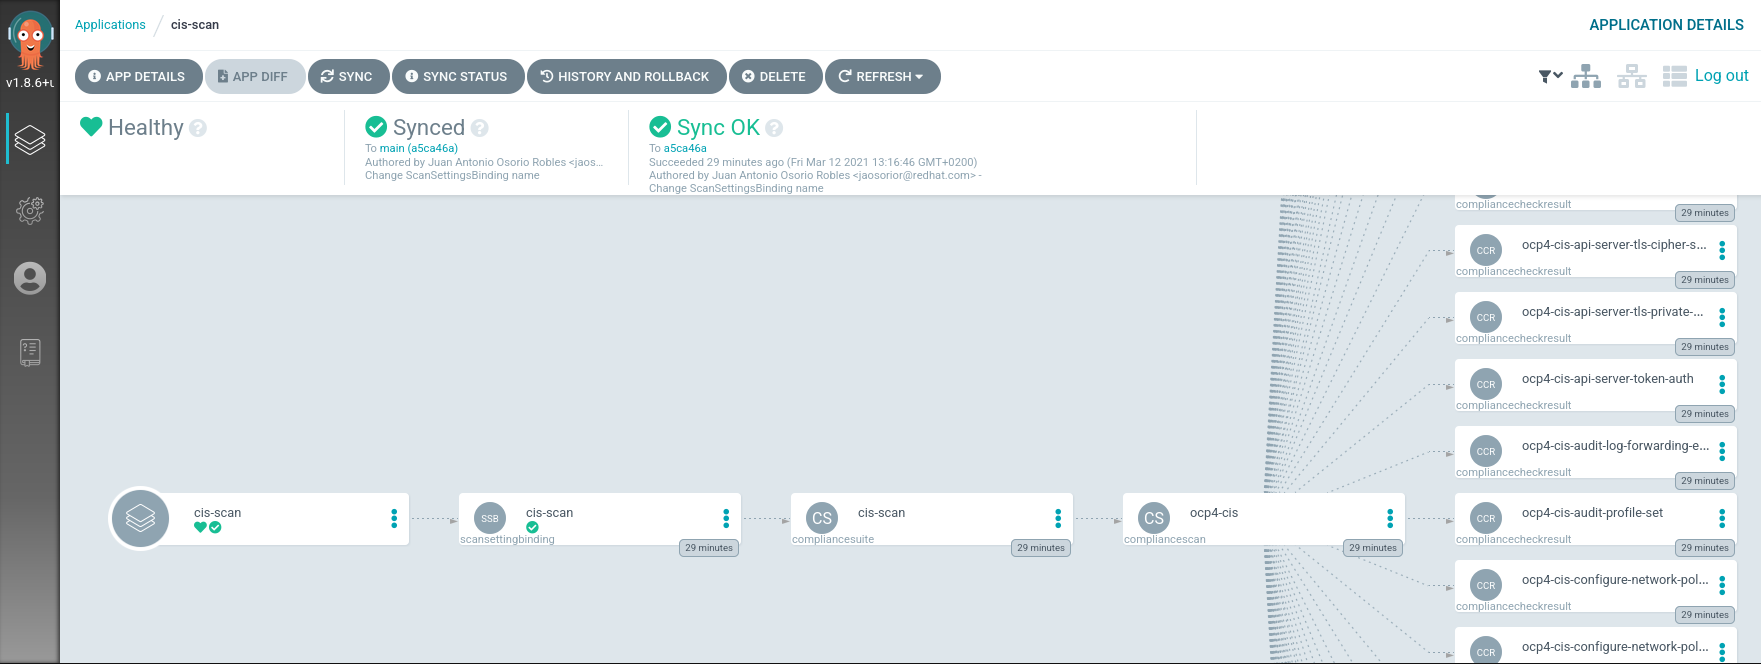
And once the scan is done, you’ll see it was persisted in the relevant namespace:
$ oc get suites -n openshift-compliance
NAME       PHASE   RESULT
cis-scan   DONE    NON-COMPLIANT
While getting a report and scans running is cool and all; we’d like to go a little further.
Scanning and Applying
The Compliance Operator is not only able to do scans and reports, it’s also able to apply automatic remediatitons. Let’s give that a try!
The ScanSettingBinding we used earlier, bound the CIS profile to the
“default” ScanSetting. This is default options merely allow you to do daily
scans. With this type of object, we can also tell the operator we want to
auto-apply any remediations that the operator recommends.
In version v0.1.29, the Compliance Operator will ship with another ScanSetting
instance called “default-auto-apply”. As the name suggests, this auto-applies
any remediations found, and updates them if needed (as more content is delivered).
Note that you could also write your own ScanSettings, if you need. But in this case, we want to keep it simple and use the ones that ship with the operator.
Let’s now scan our cluster with the “moderate” profile for RHCOS. With the
oc-compliance plugin, we can generate the appropriate object:
$ oc compliance bind --name moderate-scan profile/rhcos4-moderate \
    --settings default-auto-apply --dry-run
This will generate the following manifest:
---
apiVersion: compliance.openshift.io/v1alpha1
kind: ScanSettingBinding
metadata:
  name: moderate-scan
profiles:
- apiGroup: compliance.openshift.io/v1alpha1
  kind: Profile
  name: rhcos4-moderate
settingsRef:
  apiGroup: compliance.openshift.io/v1alpha1
  kind: ScanSetting
  name: default-auto-apply
In the repo, we have stored this in another folder
which we can now track with its own Application manifest:
apiVersion: argoproj.io/v1alpha1
kind: Application
metadata:
  name: moderate-scan-and-apply
  namespace: openshift-gitops
spec:
  destination:
    namespace: openshift-compliance
    server: https://kubernetes.default.svc
  project: default
  source:
    directory:
      recurse: true
    path: scan-and-apply
    repoURL: https://github.com/JAORMX/compliance-operator-gitops.git
    targetRevision: main
  syncPolicy:
    automated:
      prune: true
      selfHeal: true
Once we apply that, we’ll see the progress in the UI:
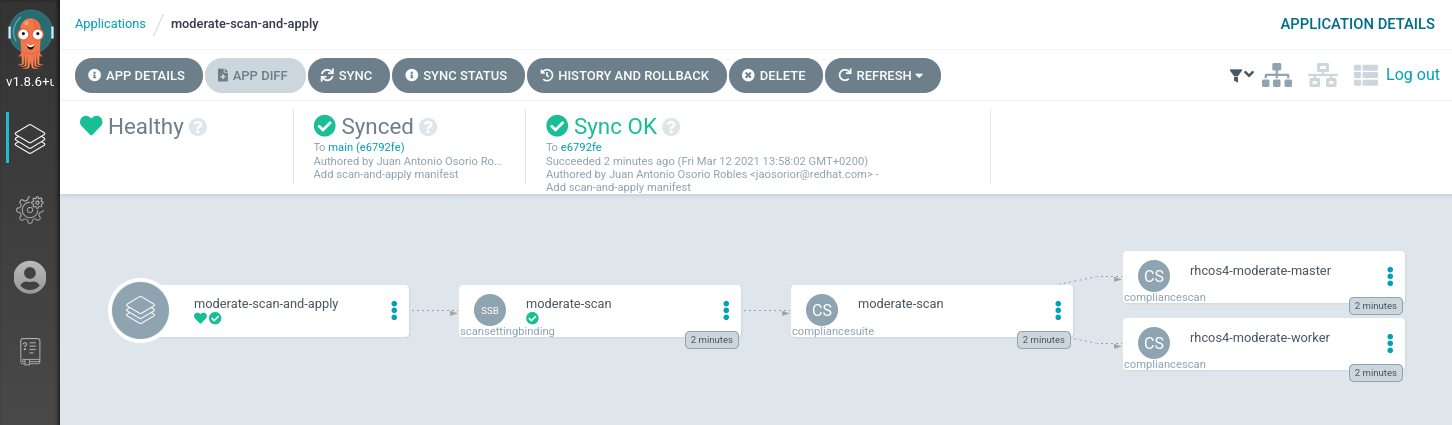
At this stage, the scan will take a little longer as the moderate profile
is quite big. And subsequently, you’ll notice your nodes starting to
restart as the profile’s remediations apply MachineConfig objects
that will enhance your nodes with the recommended configurations.
If we check the remediations, we’ll see that the ones generated by the moderate profile have been applied:
oc get complianceremediations -n openshift-compliance | head
NAME                                                                                                STATE
ocp4-cis-api-server-encryption-provider-cipher                                                      NotApplied
ocp4-cis-api-server-encryption-provider-config                                                      NotApplied
rhcos4-moderate-master-audit-rules-dac-modification-chmod                                           Applied
rhcos4-moderate-master-audit-rules-dac-modification-chown                                           Applied
rhcos4-moderate-master-audit-rules-dac-modification-fchmod                                          Applied
rhcos4-moderate-master-audit-rules-dac-modification-fchmodat                                        Applied
rhcos4-moderate-master-audit-rules-dac-modification-fchown                                          Applied
rhcos4-moderate-master-audit-rules-dac-modification-fchownat                                        Applied
rhcos4-moderate-master-audit-rules-dac-modification-fremovexattr                                    Applied
We could use the same ScanSettings for the “cis-scan” profile by changing
the manifest and commiting that to the git repo. The OpenShift GitOps operator
would automatically pick that up and make it happen.
Conclusions
The OpenShift GitOps operator is a very useful addition to your flow and when paired with the Compliance Operator, it easily enables you to track ensure compliance scans are happening in your deployment, as well as keeping your cluster compliant and tracking changes in your compliance policy.
I’ll be doing more experiments with this operator, so… stay tuned!
Note
The aforementioned ScanSettings objects will do daily scans. If you would
like the scans to be more often (or less often), you can either change the
objects or create your own, and change the schedule which accepts cron format.
tags: openshift